


What breaks on the handle? The steam mop handle consists of two internal plastic sleeves that provide a slip connection. A screw then pulls the two sections of the handle together, clamping around the metal arm of the handle.
The internal plastic screw mounts are the weak part of the Shark handle!
Eventually, the internal plastic mounts can break off from the main sections, leaving an upper handle that no longer secures to the metal arm.
How to Fix the Original Handle
I scoured the parts section of my local Ace Hardware and came up with a solution for under $4. The result surpasses the original durability and looks OEM.
Depending on your region you may be able to find similar parts at other local hardware stores.
Tools Needed:
- 5/32″(4mm) or 11/64″(4.4mm) drill bit
- 13/64″(5.2mm) drill bit
- Drill
Parts Needed:
- 2 ea. 3/16″ diameter x 3/4″ long aluminum binding screw / posts; also called sex bolts.
- Optional: 2 ea. 5/16″ diameter x 1/2″ long aluminum spacers.

Note: The provided part sizes are not an exact fit, but work fine for this project. If you want exact part sizes (7/8″ long sex bolt and mating screw + 5/8″ long spacer) that aren’t available locally, try online suppliers.
Step 1. Drill > Deburr
If the internal stems are not already completely broken off in all 4 spots; try to snap them off with a pliers.
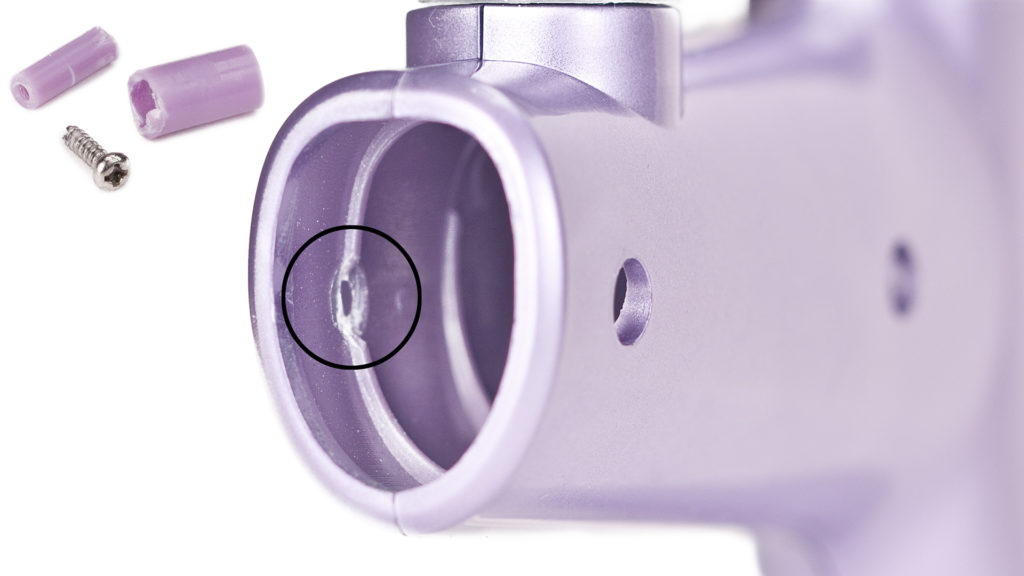
Using a 5/32″ or 11/64″ drill bit, insert the bit through the existing holes and continue drilling through the opposite wall of the handle where the original sleeves were connected. These don’t have to be pretty. Something as simple as a utility knife will be fine to deburr the edges if needed.
**The remnants of the original plastic sleeve (circled in black) will provide the exact spot to drill through.
Step 2. Modify Spacers
Note: Steps 2 & 3 are optional. Eliminate the use of spacers if you feel this is an excessive process and the needed tools aren’t available. You may find that the binding screws alone – firmly and securely clamp the plastic portion of the handle to the metal stem.
This will be the most difficult part of the repair. The internal diameter of the spacer is slightly too small for the binding posts (13/64″ / 5.2mm) to slide through, so they will have to be bored out. Secure the .5″ long aluminum spacers you purchased, then use the 13/64″(5.2mm) drill bit for boring the I.D.
Q) Why not just use a larger diameter binding post and remove this process?
A) The handle curves. The parts sizes given are the largest sizes where the faces of the binding post and screw will sit flush against the flat part of plastic handle. Any larger, and a gap starts to form between the faces of the screw and post as the handle curves.
Step 3) Insert Spacers
Once the above is completed, insert the spacers into the metal handle. These will help fill the internal void and help eliminate movement once the binding posts are installed.
Tip: The internal diameter of the metal handle holes are 8.5mm. This is not a common size for a spacer. If wanting a more secure fit, using a metal specific product – Loctite® Plumber and Marine Clear Adhesive – or similar is suggested. I haven’t had any issues with not using an adhesive.
Step 4) Reinstall Handle
- Slide the plastic handle back over the metal shaft, lining up the holes.
- Slide the stem (female) section of each binding post through the original holes of the plastic handle and through the internal aluminum spacers.
- Take the threaded (male) section of the binding posts and insert them through the newly drilled holes. Screw and tighten the binding posts.
**When tightening, the screwdriver can easily mar the binding screws soft aluminum material. A small file will deburr the rough edges, if needed.

Final Assembly
Once the binding posts are fastened tightly, your Shark Steam Mop handle will be better than new, while creating a clean OEM look.


